Yep. Operator error is the top reason for sewing machine “break down.” Time and time again, the only problem with a machine I am working on is something that could be easily remedied by reading the manual. There are several sub categories to this revelation, and I mean to run you through a the worst offenders.
Needle in backwards, sideways, or not inserted all the way up.
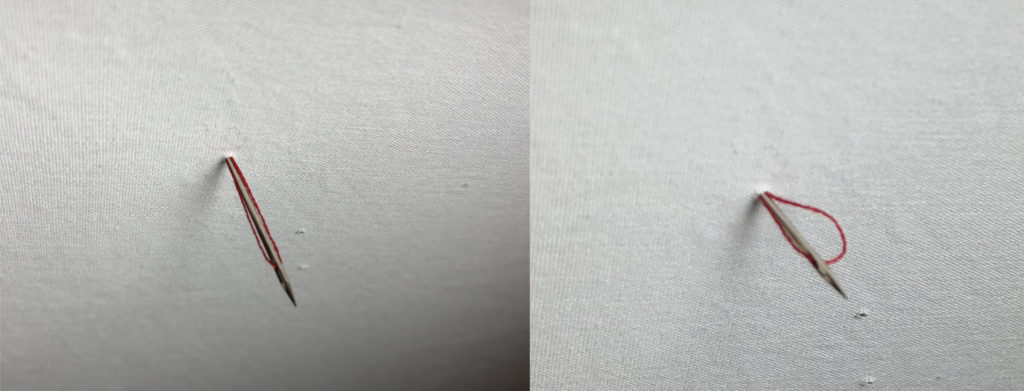
So let’s look at needle anatomy. There is the thick shaft on the top that is flat on one side: this is the back. Along the front, you will find a long groove. This is for the thread to slide into. The back has no groove, but it has a small scarf instead. The effect is that the thread gets pinned to the needle by the fabric in the back, but not the front. The hook can then swing by and pick up that loop, shrug it all the way around and thus form a stitch. Repeat endlessly.
This is why it’s so important to get that needle in correctly. If the eye is not in the right point in space and time, the needle cannot form a loop, and the hook cannot pick up this thread loop, and the sewing gets all wibbly wobbly resulting in no stitch.
Here is the hard and fast rule: The flat of the needle ALWAYS goes toward the hook. For some machines that means it goes to the back (front loading and top loading machines) , and some to the right (left loading machines), and a few to the left (the left loading Singer Featherweight).

The needle goes in, and on the upstroke, the loop is formed in the back. The thread slack is removed by the action of the take-up lever. The thread moves freely in the thread groove at the front, while the thread in back does not. The hook can then swoop on by and pick up that loop.
Damaged needle
The Golden Rule of sewing machines is, at the very least, to CHANGE YOUR NEEDLE EVERY PROJECT. Needles get worn out. They get burrs. They get bent. Damaged needles can damage your fabric. Again, if the needle eye is not in the correct space and time (it’s bent), it cannot make a stitch. Tiny differences will nix the stitch. If there is a burr, the thread may get caught on it causing tension issues, along with pulling threads in your fabric. Pro tip: If you hit something, like a pin, or the throat plate, stop and change your needle. Fresh needles glide through the fabric, and just plain make your work easier. Never work harder than you need to. Think of all the things you can complete if you are not spending time fighting your work.
Wrong needle for the job
There are needles for an amazing array of applications—some of them specialty applications like double and wing needles. We’ll keep it simple here: Fine needles are for lightweight fabrics. You must also make sure that you match your thread to the fabric and needle. Thin, light thread, like Madeira, is for batiste, china silk, and handkerchief linen fabrics. Heavier thread like Mettler is best for denim and velour fabrics. If you are going to use that heavy thread, the groove in the needle must be big enough for it to fit in there, so you guessed it: No loop. No stitch. Make sure your needle fits both thread and fabric.
Pro tip: You may have use for leather needles, but in my experience they are not necessary for most garment leathers. Because of their chisel shape, they leave a larger hole than is necessary and should be saved for heavy leathers only.
Junk thread or old thread
Bargain thread is no bargain. It’s fuzzy, and slubby and as such is rage-inducing as it will not move through the machine well. Likewise quality thread with price labels under $1.00 should be thrown away. They are far too old, and quite possibly dry rotted. Your machine will produce inferior stitches with inferior thread. Keep the wooden spools. People collect those now.

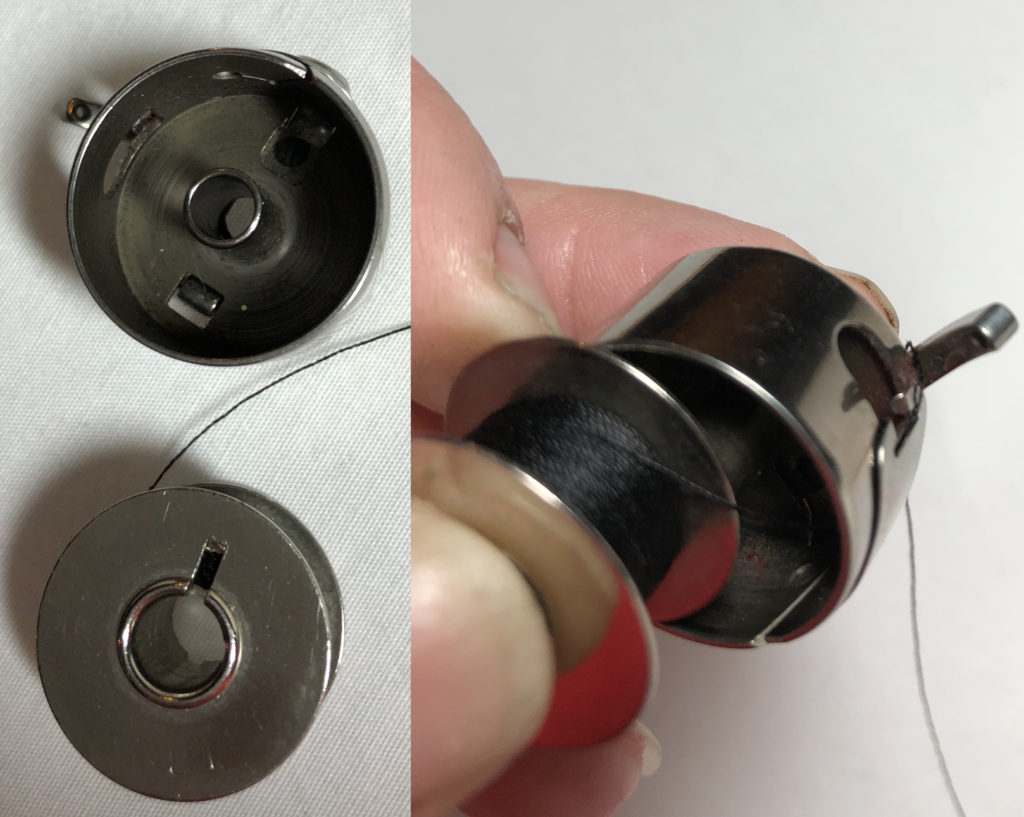
The thread should be smoothy wound onto the bobbin with no tails. Insert the bobbin so the thread will make a U-turn under the tension spring. The thread should pull smoothly, with only enough drag to arrest the bobbin case if you were to hang it from the bobbin thread. A light shake should get it to move.
Wrong bobbin or bobbin in backwards
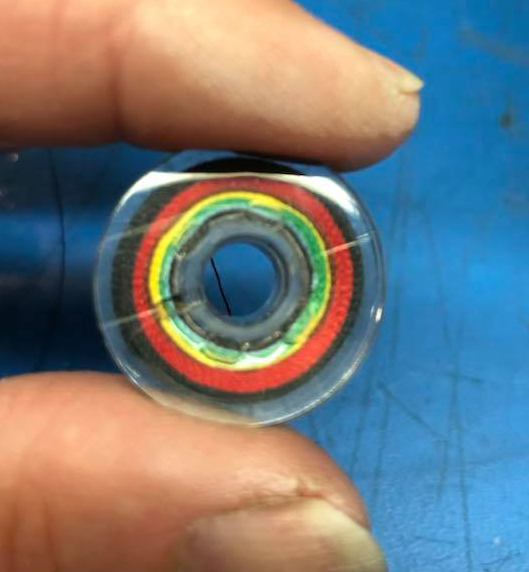
Bobbins are not interchangeable. Your machine is meant to work with one type. Find out what it is, and use no other. You might be able to put another type in there, but you will not be able to sew with it. Make sure your bobbins are wound smoothly, with no tails wrapped around the outside. Bobbins should be inserted with the thread going against the tension spring, making a U-turn under the spring. And please, ONE color thread per bobbin. You are not going to use that thread you are covering over with the 6 other layers of thread.
Bobbin case is not correctly inserted
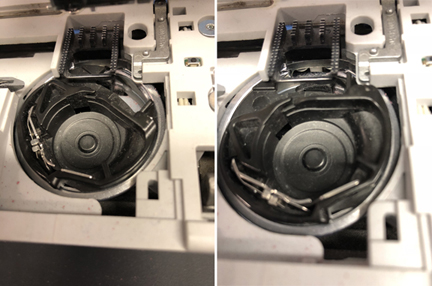
The bobbin case goes in one way and one way only. Stop and take a look at it and see if it makes sense. Is there a place for the needle to go? If you have a front load, make sure it snaps all the way in.

“The needle keeps hitting something in the bobbin area.” Well yes of course it does. If you stop to look, you can see that the bobbin case is not where it ought to be. There is no opening through which the needle can pass. The photo on the right shows how it should look.
Not correctly threaded
Usually you’ve missed the take-up lever. Without the take-up lever, the thread is just going to get caught in the hook and make a disproportionately loud and raucous noise, and no stitch will form. It will be a mess underneath. Some of you call it “bird nesting”. I have no idea why. It’s silly.
It’s in free-motion mode
If the presser foot is floating, it’s not going to be able to feed the fabric, nor will it make a stitch (because you will not have the free-motion foot on it). Some machines have a switch on the presser foot lifter, which I find annoyingly easy to engage by accident. Others have it under the head frame, or it might be be a button on a touch screen. If your presser foot is not firmly planted on the feed dogs, it can’t sew because the fabric is going up and down with the needle and the thread can’t make a loop. Look for the free motion button and be sure it’s in sew-mode. Don’t have a free-motion button? That’s not odd. Some machines require a spring foot for this technique and as such have no free-motion button. It just means that you won’t need to worry about this problem.
Tension is set wonky
Seriously, the tension is nothing more than a couple of disks with a spring pushing against them. There is nothing technical or difficult about it. Generally, leave your bobbin case tension alone once it is properly set, and adjust the overall tension with the top tension only. Your bobbin case should have a little drag on it. As a general ballpark across-the-board-for-front-loading-machines, if you load the bobbin case with a filled bobbin, and hang the whole kit from the thread, the bobbin case should not slide down unless you give it a soft shake.
You’re using monofilament thread
This stuff is the devil’s spawn. It gets caught in the take-up lever, where it can melt from the friction. It’s finer than thread, so it will be difficult to get good tension with it. Avoid it.
Never even considered cleaning the thing at any time during the 30 years you owned it.
If there is only so much lint, broken needles, and thread your machine can work around. Once it gets so bad it felts, you are not going to get a decent stitch out of your machine. Do the right thing. Take out the bobbin case, and brush out the lint from around the hook. Unless you have the kind of machine that is very open, like a Bernina 830 Record, avoid using canned air. It tends to just blow the lint into the machine where it will mess with other important parts. Yes. Cleaning is expected maintenance from you. If the thread cannot make it around the hook, it is not going to be able to make a stitch. Keep that thread path clear, and the yok out of the hook. Also look for any lint crammed into the bobbin case, or under the bobbin case spring. Use a pin to gently pull it out. Canned air can also be helpful with getting lint out of the bobbin case. Lint in the bobbin case will cause the bobbin tension to be off, usually making it too loose.
Never even considered oiling the thing at any time during the 30 years you’ve owned it.
This is one area the varies by make and model. The older machines all need to be oiled on at least one or two places about every couple of projects—usually the hook race. The newer ones have oil impregnated bushings that should not be oiled. Too much oil attracts lint, and gums up your machine. Don’t over oil! Please, find you manual and read it. Oil and service your machine as it instructs you. If you wait until it locks up, it might be too late. Sometimes a frozen machine can be freed up, sometimes not. If it’s the latter, you are out a sewing machine from what amounts to severe neglect. If the parts of your machine that are supposed to be moving smoothly are not, it will sound terrible, and it will not sew properly. You have plenty of warning. Don’t ignore it.
Avoid glitter or beaded fabric.
This stuff gets everywhere. It gets into the gears. It’s a mess. If you promise to use beaded fabric properly and not just sew over the beads, that’s okay to use. The beads must be removed from the seam allowances before the pieces are assembled. After the garment is sewn and fitted, you then apply the beads back over the seams by hand. Just always say no to glitter/cracked ice stuff the gets passed off as fabric.
You don’t let the machine do the work and all the tugging on the fabric you keep doing has rammed the needle into the throat plate and hook a million times rendering them full of burrs.
Are you pulling the fabric through your machine? Why? Your machine has feed dogs for that purpose. Their express reason for being is to move the fabric at the precise time that the needle is OUT of the fabric. Need to to go faster? Then push the foot control more. Got it floored but it’s still too slow? Get a better machine. At no time should you be pulling your fabric through the machine. Why would you want to work so hard anyway? Pulling the fabric will deflect the needle, sending it into the hook, or throat plate. This leaves burrs that will affect stitch quality, possibly knock it out of time, or impede the feed of the fabric. Guide the fabric. Do not pull.
The stitches are slanted!
No. 99% of the time they are not. Top and bobbin thread are necessarily parallel, and geometry requires that they must twist to cross. If you want to prove this, unthread your machine and sew on some lined paper. See? Perfectly straight.
You (or your husband) tried to fix it.
Yeah. About that. Don’t. It only means that some sewing machine tech somewhere needs to waste time figuring out what bizarre and unrelated-to-the-actual-issue thing you did. That tech also must waste more time hunting up parts that you have lost in the process of “fixing” it. It’s easier and cheaper to just bring it in to a qualified tech to begin with.
You kept it in your garage or basement and now it’s rusty.
Sucks to be you. Sewing machines must be kept in a dry environment. Always.
The moral of the story: Use real thread. Change the needle, check the settings, check the bobbin case, rethread, clean and oil. If that fails, bring it to a tech. Taking a look at the owners manual is always a good idea. Lost yours? Go to your dealer for a new one, or check ISMACS.net.


Thank you for suggesting you avoid glitter and beaded fabric when trying to keep your machine running properly. My mother loves sewing but her machine doesn’t seem to be working properly. I think she should see if she can figure out what part it needs and find somewhere that she can order it to save her the trip to the repairman.
I’d suggest that a trip to the repairman is a better idea. I get far too many machines on my bench that someone has tried to fix. It’d always more expensive that way.